


Table of Contents
- Intro
- Project Setup
- Creating the Kernel Functions
- Async and CUDA Streams
- Conclusion
Intro
Manipulating and analyzing images is one of the most useful and interesting topics in the field of computer and data science. With so much of the world being ingested or displayed as an image, the amount of data, the speed at which data is collected, and the use cases for the data are growing exponentially. One of the most common methods for image manipulation is image filtering. This technique involves operating on a pixel-by-pixel basis to transform one image to another. There are a wide variety of image filters, some very simple and straightforward while others are more complex.
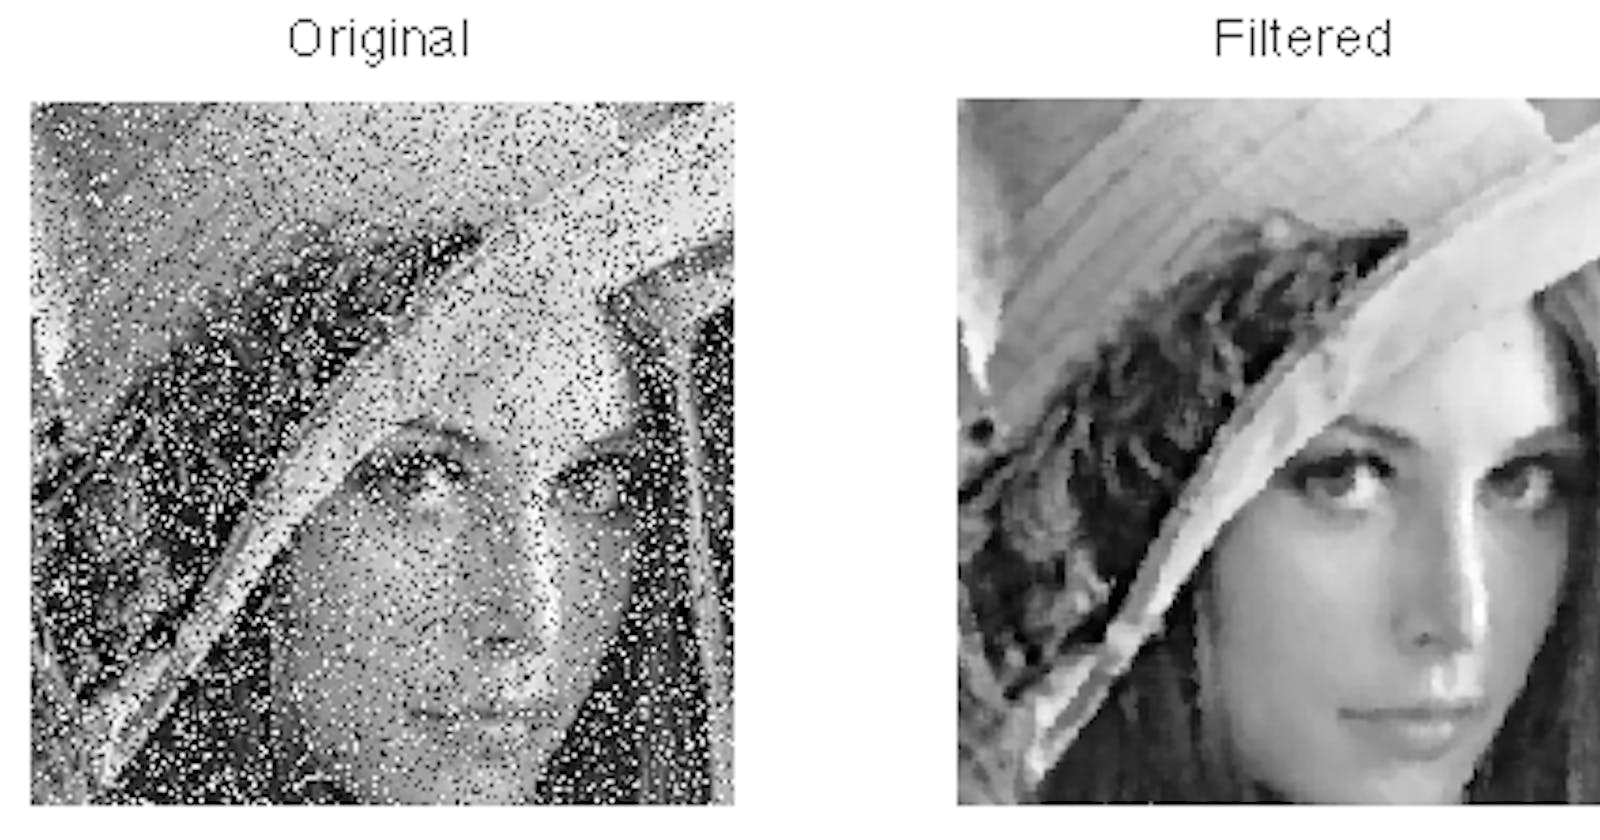
One particularly popular and widely used image filter is called the median filter. This filter's primary purpose is to denoise and soften images. Specifically, salt and pepper noise which looks like dark or corrupted pixels on the image. The way this filter operates on a pixel scale, is by looking at the surrounding neighboring pixels, specified by the size of the window desired, in an image, storing them in a list, and selecting the median value from that list. That selected median value is now the new pixel value for the pixel that was operated on. This is a fairly simple algorithm but there is an edge case. Border pixels that don't have enough neighboring pixels to satisfy the window size requirement are generally cropped out of the image, thus making the image smaller slightly in the process.
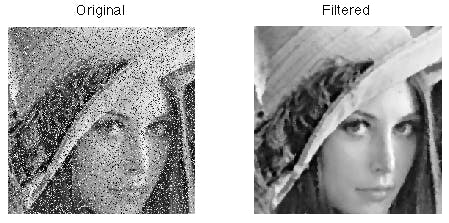
Median Filter Example
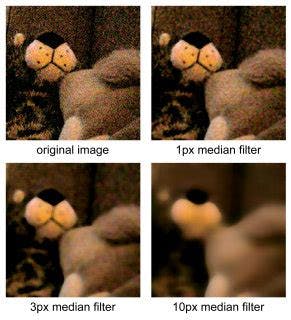
Median Filter Effects
Graphics Processing Units (GPUs) are specialized processing units made specifically are operating on images and graphics. Dedicated chips for graphics have been around since the 1970s starting with the first graphical user interfaces and video games but have become increasingly useful with the need for high-performance computing in data science, machine learning, and even in digital currency. GPUs allow for doing billions of operating in parallel while also offering an advanced memory hierarchy to allow for varying levels of memory I/O speeds and accessibility. It's clear that GPUs are the perfect hardware for performing image filtering. Even with high definition and pixel-dense images, the GPU has the resources for one GPU thread per pixel. This means that for the majority of image filters, the median filter included, the operating can be done in near-constant time.
There are plenty of methods, historically, to program on the GPU but one very common method is using the software development kit (SDK) released by GPU manufacturer Nvidia called CUDA. CUDA is a compiler and set of C/C++ libraries for programming directly on the GPU and accessing the resources it has available.
The feature particularly relevant to image filters is CUDA Streams. CUDA streams allow for an asynchronous programming design. Because the majority of the work done with images involves more than one image, being able to process them asynchronously massively increases the speed of the program. Rather than waiting for another image to finish before processing, the system is now able to process images from a queue whenever resources are available. This allows potentially multiple GPUs to be added to the system to increase the number of resources available.
This blog post is formatted as a tutorial so everything is explicitly clear how it works and why it's there. By the end of the tutorial, if you follow along, you should have a working median filter that works on NVIDIA GPUS. Obviously, if you don't have an NVIDIA GPU or the compilers needed to compile CUDA code, then you won't be able to run this.
Completed code can be found here: https://github.com/jonaylor89/Median-Filter-CUDA
Project Setup
To get started, the first thing any C++ and CUDA project needs is imports and a main function. In this case, I've included an argument check in the main function since the program expects a directory of images as an argument.
#include <iostream>
#include <string>
#include <stdio.h>
#include <stdlib.h>
#include <dirent.h>
#include <unistd.h>
#include <sys/types.h>
#include <sys/stat.h>

// CUDA runtime library
#include <cuda_runtime.h>

// Read/Write images to fs
#include <opencv2/opencv.hpp>
#include <opencv2/core.hpp>

using namespace cv;
using namespace std;

int main(int argc, char **argv)
{
        if (argc < 2)
    {
        cerr << "Usage: ./main inputDirectory" << endl;
        exit(1);
    }

        **//** Define Variables
    string inputDir  = string(argv[1]);
    string outputDir = string("motified") + inputDir;

        // **TODO**
        // Allocate memory
        // Read in images
        // Copy images to the GPU
        // Run Kernels (Greyscale + Median Filter)
        // Copy back to the CPU
        // Write filtered images to disk
        // Free memory

        return 0;
}
Along with the main function, this program is going to need two kernels (functions that run on the GPU): one to convert images from RGBA to greyscale, and one to apply the median filter on the images. Having the greyscale kernel means we only have to deal with black and white images which reduces the complexity of things (although makes it a little more boring). To apply the median filter on colored images, rather than having a greyscale kernel, you would just run the median filter kernel on all color channels for the image (i.e. red, green, blue, alpha).
...

// Convert RGBA -> Greyscale : GPU functions are always void
__global__ void rgbaToGreyscaleGPU(
    uchar4 *rgbaImage, // pointer to rgba images
    uchar *greyImage,  // pointer to where the black/white image will be stored
    int rows,          // number of rows of pixels in the image
    int cols           // number of columns of pixels in the image
)
{

}

// Apple Median Filter : GPU functions are always void
__global__ void medianFilterGPU(
    uchar4 *rgbaImage, // pointer to rgba images
    uchar *greyImage,  // pointer to where the black/white image will be stored
    int rows,          // number of rows of pixels in the image
    int cols           // number of columns of pixels in the image
)
{

}

int main(int argc, char **argv) { ... }
The last two functions needed to get everything set up are a function to read a directory to get all of the files inside, as well as a function to read an image file and, with the help of OpenCV, extract the pixel values into a matrix. These are fairly trivial steps so I won't go into detail with them, but linux syscalls are used to get the files in a particular directory and OpenCV is used to get a 3D of pixel values for an image (1D is rows, 2D is columns, 3D is the color channel).
...

int readImage(
    string filename, // input filename
    Mat* inputImage, // matrix of rgba pixel values
    Mat* imageGrey   // matrix of the same size that'll be used later
)
{
        // Define Variables
    Mat image;
    Mat imageRGBA;
    Mat outputImage;

        // Use OpenCV to read the image file
    image = imread(filename.c_str(), IMREAD_COLOR);
    if (image.empty())
    {
        cerr << "[ERROR] Couldn't open file: " << filename << endl;
                return 1;
    }

    cvtColor(image, imageRGBA, COLOR_BGR2RGBA);

        // Allocate memory for identical greyscale image matrix
        // This'll help when it's time to copy things over from the GPU
    outputImage.create(image.rows, image.cols, CV_8UC1);

        // Return the image matrix by assigning it to the pointer arguments
    *inputImage = imageRGBA;
    *imageGrey = outputImage;

    return 0;
}

// Simple read_directory function you can find on stackoverflow
// ONLY WORKS ON LINUX
void read_directory(string name, vector<string> *v)
{
    DIR* dirp = opendir(name.c_str());
    struct dirent * dp;
    while ((dp = readdir(dirp)) != NULL) {
        v->push_back(dp->d_name);
    }
    closedir(dirp);
}

int main(int argc, char **argv) { ... }
Finally, putting everything together for the setup, read_directory and read_image are called from the main function. The result of all of this is two vectors, one which is a list of image matrices corresponding to the images we want to have filtered, and the other is a list of empty image matrices of the same size, which will be where we will save the new images after they get filtered on the GPU.
int main(int argc, char **argv)
{

        // Define Variables
        ...
        vector<string> inputFilenames;
    read_directory(inputDir, &inputFilenames);

    vector<Mat> outputImages;
    vector<Mat> inputImages;

        ...

        // Read in images from the fs
    for (int i = 0; i < inputFilenames.size(); i++)
    {
        Mat imageMat;
                Mat outputMat;
        string curImage = inputFilenames[i];
                string filename = inputDir + curImage;

        // Read in image
        int err = readImage(
            filename,
            &imageMat,
                    &outputMat
        );

                if (err != 0) { continue; }

        inputImages.push_back(imageMat);
                outputImages.push_back(outputMat);
    }
}
And, naturally, we can't forget a Makefile which you'll notice uses the NVIDIA CUDA compiler.
todo: main
main:
    nvcc main.cu `pkg-config --libs --cflags opencv` -o main
clean:
    rm main && rm -rf motifiedImages
Creating Kernel Functions
Kernel functions in CUDA are easy to spot because they all begin with a "dunder" identifier (e.g. __global__ ). In this case, the identifier is __global__ because it's a kernel that can be called by the CPU but there are others in the CUDA developer docs that change the behavior and scope of the kernels.
GreyScale
Kernel functions operate on one pixel value at a time. This is how they're so efficient - every pixel on every image can be operated on at the same time in parallel. The question becomes, how does the kernel know which pixel it's operating on? Luckily, CUDA has variables created under the hood that the kernel can use to get the context. The variables in the case that'll be used are blockIdx , blockDim , and threadIdx represent the ID for the current block, the dimensions for each block, and the ID for the current thread. To know more about what those variables are, it might be useful to read through the CUDA developer docs. The important thing to know is that using these variables, you can get the x and y value for the pixel the kernel should work on.
__global__ void rgbaToGreyscaleGPU(
    uchar4 *rgbaImage,
    uchar *greyImage,
    int rows,
    int cols
)
{

        // Formula to get the X and Y value from the context
        int x = blockIdx.x * blockDim.x + threadIdx.x;
    int y = blockIdx.y * blockDim.y + threadIdx.y;

    if (x > cols || y > rows)
    {
        return;
    }

    return;
}
The last thing to add is simply the formula for getting the greyscale value from the RGBA.
An important note: the
rgbaImagearray, and thegreyImageare both 1D arrays. That's why the formula for getting thexandyare weird and why indexing looks likeuchar4 rgba = rgbaImage[y * cols + x];.
__global__ void rgbaTogreyscaleGPU(
    uchar4 *rgbaImage,
    uchar *greyImage,
    int rows,
    int cols
)
{
        ...

        uchar4 rgba = rgbaImage[y * cols + x];
    unsigned char greyValue =  (0.299f * rgba.x) + (0.587f * rgba.y) + (0.114f * rgba.z);
    greyImage[y * cols + x] = greyValue;

        return;

}
Median Filter
The kernel for the median filter starts exactly the same as for the greyscale kernel.
__global__ void medianFilterGPU(
    unsigned char* greyImageData,
  unsigned char *filteredImage,
  int rows,
  int cols
)
{

        // Formula to get the X and Y value from the context
        int x = blockIdx.x * blockDim.x + threadIdx.x;
    int y = blockIdx.y * blockDim.y + threadIdx.y;

    if (x > cols || y > rows)
    {
        return;
    }

    return;
}
From there, the next step is to get the adjacent pixel values since they will be used to determine the new, filtered pixel value.
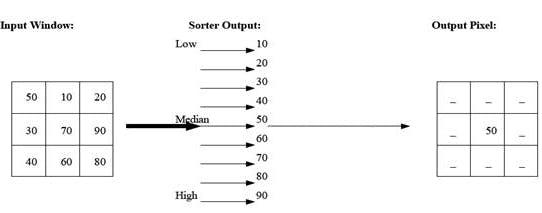
Median Filter Graphic
__global__ void medianFilterGPU(
    unsigned char* greyImageData,
  unsigned char *filteredImage,
  int rows,
  int cols
)
{

        ...

        // 3x3 window (optionally you could use a bigger window)
        int windowSize = 3;

        // Filter out the diagonals (OPTIONAL)
    int filter[9] {
        0, 1, 0,
        1, 1, 1,
        0, 1, 0
    };

        // Allocate memory to save the adjecent pixel values
    unsigned char pixelValues[9] = {0, 0, 0, 0, 0, 0, 0, 0, 0};

        // Bounds checking
    if (
        x > cols - windowSize + 1 ||
        y > rows - windowSize + 1 ||
        x < windowSize - 1 ||
        y < windowSize - 1
    )
    {
        return;
    }

        // Loop through vertical and horizonally to get adjecent values
    for (int hh = 0; hh < windowSize; hh++)
    {
        for (int ww = 0; ww < windowSize; ww++)
        {
            if (filter[hh * windowSize + ww] == 1)
            {
                int idx = (y + hh - 1) * cols + (x + ww - 1);
                pixelValues[hh * windowSize + ww] = greyImageData[idx];
            }
        }
    }

        return;

}
With a list of all pixel values in the window, the last thing to do is determine the median value and make that the new pixel value.
You have to do this all manually because you can't use std lib inside the Kernel functions ☹️
__global__ void medianFilterGPU(
    unsigned char* greyImageData,
  unsigned char *filteredImage,
  int rows,
  int cols
)
{

        ...

        // Sort the pixel values
    for (int i = 0; i < (windowSize * windowSize); i++) {
        for (int j = i + 1; j < (windowSize * windowSize); j++) {
            if (pixelValues[i] > pixelValues[j]) {
                //Swap the variables.
                char tmp = pixelValues[i];
                pixelValues[i] = pixelValues[j];
                pixelValues[j] = tmp;
            }
        }
    }

        // Get the middle of the list for the median
    unsigned char filteredValue = pixelValues[(windowSize * windowSize) / 2];
    filteredImage[y * cols + x] = filteredValue;

        return;
}
Async and CUDA streams
Now to tie it all together and make it work.
Programming anything on the GPU is a 5 step process:
- Allocate Memory
- Copy to the GPU
- Run Kernels
- Copy back to the CPU
- Free memory
Allocating Memory
Beginning with Allocating memory correctly, we first have to go back and define a few new variables and structs. At the top of the file, I create my own FakeMat struct which helps clean things up later on. In the main function, we have to create and initialize the array of CUDA streams. we also need to define the pointers which will store the location of the images after they're copied to the GPU (prefixed with d_).
#define THREAD_DIM 256
#define NUM_STREAMS 32
#define MAX_IMAGE_SIZE (1920 * 1080)

typedef struct FakeMat_ {
    unsigned char *Ptr;
    int rows;
    int cols;
} FakeMat;

...

int main(int argc, char **argv)
{

        // Define Variables
        ...

        cudaStream_t streams[NUM_STREAMS];
        for (int i = 0; i < NUM_STREAMS; i++) { cudaStreamCreate(&streams[i]); }

    uchar4 *d_rgbaImage;
    unsigned char *d_greyImage;
    unsigned char *d_filteredImage;

        ...

}
To actually allocate memory, the functions cudaMalloc() and cudaMallocHost() have to be used as opposed to the normal malloc() because memory is being allocated on both the local machine (i.e. Host) and on the GPU.
int main(int argc, char **argv)
{

        ...

        // Allocate Memory
    cudaMalloc(&d_rgbaImage, sizeof(uchar4) * MAX_IMAGE_SIZE * NUM_STREAMS);
    cudaMalloc(&d_greyImage, sizeof(unsigned char) * MAX_IMAGE_SIZE * NUM_STREAMS);
    cudaMalloc(&d_filteredImage, sizeof(unsigned char) * MAX_IMAGE_SIZE * NUM_STREAMS);

    // Read in images from the fs
    for (int i = 0; i < inputFilenames.size(); i++) { ... }

    FakeMat *outputImagesArray;
    cudaMallocHost(&outputImagesArray, sizeof(FakeMat) * inputImages.size());

}
Copying to the GPU
Once memory has been allocated on the GPU, the image data collected can be copied over. The functions CUDA provides for copying and settings data on the GPU are cudaMemsetAsync() and cudaMemcpyAsync() . You'll notice in the code below, to make everything more efficient, all of the images are being squished to 1D arrays and those arrays are concatenated together. This means that we're basically just copying one huge 1D array full of all of our image data over to the GPU and although this seems like a lot of boilerplate, under the hood it's making things much more efficient.
btw - CUDA also provides synchronous functions
cudaMemset()andcudaMemcpy()but because we're operating on many images at once using streams, we use the async versions.
int main(int argc, char **argv)
{

        ...

        // Loop through all the images
        for (int i = 0; i < inputImages.size(); i++)
        {
                // Get the current stream
            const int curStream = i % NUM_STREAMS;
            Mat curImageMat = inputImages[i];

            int rows = curImageMat.rows;
            int cols = curImageMat.cols;
            int size = rows * cols;

                if (size >= MAX_IMAGE_SIZE) { continue; }

                // Clear any old data from the GPU
            cudaMemsetAsync(d_rgbaImage + MAX_IMAGE_SIZE * curStream, 0, sizeof(uchar4) * MAX_IMAGE_SIZE, streams[curStream]);
            cudaMemsetAsync(d_greyImage + MAX_IMAGE_SIZE * curStream, 0, sizeof(unsigned char) * MAX_IMAGE_SIZE, streams[curStream]);
            cudaMemsetAsync(d_filteredImage + MAX_IMAGE_SIZE * curStream, 0, sizeof(unsigned char) * MAX_IMAGE_SIZE, streams[curStream]);

                // Special CUDA functions to set the gridSize and blockSize
                // Check the developer docs for more info on what they do and why they're important
                // In short: GPUs are very complex
            dim3 gridSize (ceil(cols / (float)THREAD_DIM), ceil(rows / (float)THREAD_DIM));
            dim3 blockSize (THREAD_DIM, THREAD_DIM);

                // Get the pointer for the image data
                uchar4 *curImagePtr = (uchar4 *)curImageMat.ptr<unsigned char>(0);
                if (curImagePtr == NULL) { continue; }

            // Copy data to GPU
            cudaMemcpyAsync(
                d_rgbaImage + MAX_IMAGE_SIZE * curStream, // HUGE 1D array of all the pixels
                curImagePtr,             // Pointer to the image
                sizeof(uchar4) * size,   // Size of the image (total number of pixels
                cudaMemcpyHostToDevice,  // Enum value provided by CUDA
                streams[curStream]       // Which stream is in charge of this image
            );
        }
}
Running Kernels
To run the kernels, you use almost the exact same syntax as calling a function in C but with extra <<<>>> which is where you short context about the GPU (grid size, block size, and the current stream, check out the CUDA docs for more info). Note too that because we copied the data over to the GPU as a big 1D array, the arguments that get past have to accommodate by doing some pointer math and offsetting the pointer value.
for (int i = 0; i < inputImages.size(); i++)
{

        ...

        // Run kernel(s)
        rgbaToGreyscaleGPU<<< gridSize, blockSize, 0, streams[curStream] >>>(
            d_rgbaImage + (MAX_IMAGE_SIZE * curStream),
            d_greyImage + (MAX_IMAGE_SIZE * curStream),
            rows,
            cols
        );

        medianFilterGPU<<< gridSize, blockSize, 0, streams[curStream] >>>(
            d_greyImage + (MAX_IMAGE_SIZE * curStream),
            d_filteredImage + (MAX_IMAGE_SIZE * curStream),
            rows,
            cols
        );

}
Copying back to the CPU
After the kernel is run, the new, filtered images have to be brought back to the CPU. This is done almost identically to copying the images to the GPU. (i.e. with cudaMemcpyAsync())
for (int i = 0; i < inputImages.size(); i++)
{

...

        // Create a pointer to which the output image is saved
        unsigned char *outputImagePtr = outputImages[i].ptr<unsigned char>(0);

        // Copy results to CPU
    cudaMemcpyAsync(
        outputImagePtr,
        d_filteredImage + MAX_IMAGE_SIZE * curStream,
        sizeof(unsigned char) * size,
        cudaMemcpyDeviceToHost,  // Enum value provided by CUDA
        streams[curStream]
    );

        // Store the image in an array
        outputImagesArray[i] = (FakeMat){ outputImagePtr, rows, cols };
}
Freeing Memory and Writing Results
As you could probably guess from the word Async being on all of the CUDA functions, those operations aren't synchronized and destroyed until you explicitly tell them to, therefore, right after the for loop for handling each image, the streams have to be synchronized.
int main(int argc, char **argv)
{

        ...

        for (int i = 0; i < inputImages.size(); i++) { ... }

        // sync and destroy streams
    for (int i = 0; i < NUM_STREAMS; i++)
    {
        cudaStreamSynchronize(streams[i]);
        cudaStreamDestroy(streams[i]);
    }

}
With the streams synced up, we can be sure that everything is finished and you're safe to write the new, filtered images to disk. Once again, OpenCV helps with this by making things fairly straightforward. The 1D images are converted to a type that OpenCV understands (i.e. Mat) then written to disk with cv::imwrite().
...

void writeImage(string dirname, string filename, string prefix, Mat outputImage)
{
    string outFile = dirname + string("/") + prefix + filename;

    cv::imwrite(outFile.c_str(), outputImage);
}

int main(int argc, char **argv)
{

        ...

        // Create a directory for the new images
        struct stat st = {0};
    if (stat(outputDir.c_str(), &st) == -1) {
        mkdir(outputDir.c_str(), 0700);
    }

    // Write modified images to the fs
    for (int i = 0; i < inputImages.size(); i++)
    {

                if (outputImagesArray[i].Ptr == NULL) { continue; }

                // Convert images to OpenCV Mat type
                Mat outputImageMat = Mat(
                        outputImagesArray[i].rows,
                        outputImagesArray[i].cols,
                        CV_8UC1,
                        outputImagesArray[i].Ptr
                );

        // Write Image
        writeImage(outputDir, to_string(i) + string(".jpg"), "modified_", outputImageMat);
    }
}
Last and definitely not least, any allocated memory on both the host and GPU must be freed.
int main(int argc, char **argv)
{

        ...

        // Free Memory
    cudaFreeHost(&outputImages);
    cudaFree(&d_rgbaImage);
    cudaFree(&d_greyImage);

    return 0;
}
Conclusion
We finally have a working program 😤 and it really only took around ~300 lines of code. With those 300 lines though it's now possible to run image filters on A LOT of images VERY FAST. How fast depends on your GPU and the number of images but it should be able to do many images per second.
In the future, it would be great to implement something involving a reduction set such as a histogram segmentation which would require reducing the image to a histogram before calculating pixel values. This greatly complicates the parallelization process and might cause some difficulty on the GPU side of things. Along with that, another field of study to investigate further with this is real-time image processing. The speeds achieved with the GPU accelerated version were plenty fast to be considered real-time but perhaps doing something a bit more complicated to parallelize as well as moving to more resource scare hardware like internet of things devices or drones might stress the system to its limits.
Completed code can be found here: https://github.com/jonaylor89/Median-Filter-CUDA
Further Reading & Links
- https://en.wikipedia.org/wiki/Median_filter
- https://en.wikipedia.org/wiki/CUDA
- https://developer.nvidia.com/cuda-zone
- https://developer.nvidia.com/cuda-zone
- https://docs.nvidia.com/cuda/cuda-c-programming-guide/index.html
- https://www.nvidia.com/en-us/autonomous-machines/embedded-systems/jetson-nano/